How to remove fuel injectors from. How to remove fuel injectors yourself. Making a homemade device for cleaning injectors
Engine injectors Common Rail Sometimes it needs to be cleaned, repaired or replaced. To do this, they need to be removed from the engine. I’ll tell you how I did it in this article.
Before we begin. Important.
Some injectors have correction codes for the amount of fuel injected. Therefore, before removing it, it is advisable to find out whether your injectors have them. If they have or do not have the opportunity to obtain such information, then it is better to remember which injector was located where, this will not make it worse, and if there are no such codes, then the installation locations are not important, as in my case.
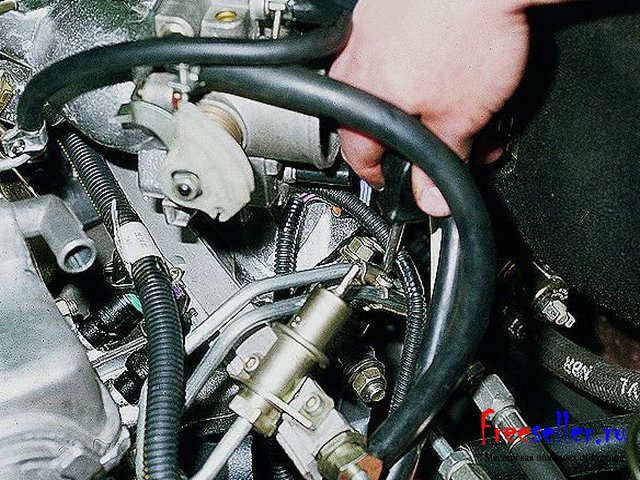
Looking under the hood, we will most likely see a plastic dust-heat protection cover.
It is held on by four screws. We unscrew them and remove the casing. Now we see the engine itself.

First, open the relay and fuse box under the hood and pull out the relay fuel pump. This is to prevent diesel fuel from flooding the engine and floor if you suddenly need to turn on the ignition.

Then disconnect the electrical connectors of the injectors.

Let's pull out the locking clips that secure the return hose connections.


Often, as a result of contamination of the injectors, malfunctions in the operation of the propulsion system can be noticed. If the engine loses productivity to a significant extent, it begins to consume more fuel mixture, exhaust gases become more toxic - you must definitely pay attention to the condition of the injectors.
About cleaning injectors.
Cleaning injectors is a slightly more complex procedure than replacing injectors. At the same time, cleaning the elements allows you to save some money on car maintenance. That is why most car enthusiasts prefer to clean the injectors themselves. In most cases, cleaning of elements begins after malfunctions in the operation of the engine system are discovered. Of course, a more correct and productive solution would be to diagnose the car and replace the injectors before the engine loses its productivity. Modern vehicle manufacturers recommend checking the condition of the elements after a mileage of 40,000 km.
What effect can be obtained from replacing or washing the element?
Of course, changes in the operation of the motor will depend on the condition of the elements. If the injectors are heavily clogged, cleaning or replacing them can significantly restore the correct operation of the engine system.
Typically, the results of injector restoration are:
- Optimizing gasoline consumption.
- Improved engine performance.
- Elimination of various malfunctions in the engine system.
- Correct engine operation at idle speed.
- The easiest way to start a cold engine.
The modern car enthusiast knows a considerable number of means that allow him to clean injectors without independent intervention. The shelves of automobile stores are overflowing with various additives for car systems. Using additives or cleaning the elements yourself is a personal matter for each car owner. On automotive forums, you can find a comprehensive amount of information about various engine cleaning compounds. It is difficult to find a definite answer about the use of additives. In this case, much depends on the state of the system vehicle and the manufacturer of the specific composition.
Let's consider a proven method of restoring injectors, with preliminary removal.
Cleaning and changing nozzles in garage conditions.
In order to restore the element in question, it is necessary to dismantle it. After carrying out visual diagnostics, you can wash the element or replace it with a new one.
In order to wash the injectors and fully restore their functionality, you need to stock up on a certain number of tools and materials.
- Rhombo - a shaped key for eight.
- Special product for cleaning injectors. You can also use carburetor flushing agents or solvents as a composition for restoring elements.
- Rubber hose. As a working material, you can use a vacuum tube from a distributor from classic models domestic cars.
- Syringe with outlet diameter 10 mm. Using this tool, you can avoid dismantling the seals.
- 2 m of electrical wire.
- Bulb and relay (10 and 12 W).
- Eight new rubber seals for internal combustion engine elements.
- Four clamps for gasoline hoses.
Recovery stages.
1. For simplicity and convenience of disassembling the propulsion system, it is worth removing the pressure in fuel line. To do this, you need to remove the fuel pump conductor. After this, we start the engine and wait until it finishes its work on its own. The procedure is repeated until the engine stops starting.
2. In order to gain free access to the nozzles for cleaning or replacement, you will need to dismantle the following elements:
- Air filter conductor.
- Injector conductor holders. The main wire clamp can be found under the thermostat tubes closer to the front glass.
- Idle speed controller lock.
- Throttle position drive.
- Vacuum conductor from the fuel system pressure controller.
- Gasoline supply conductor.
- Gas pedal cable.
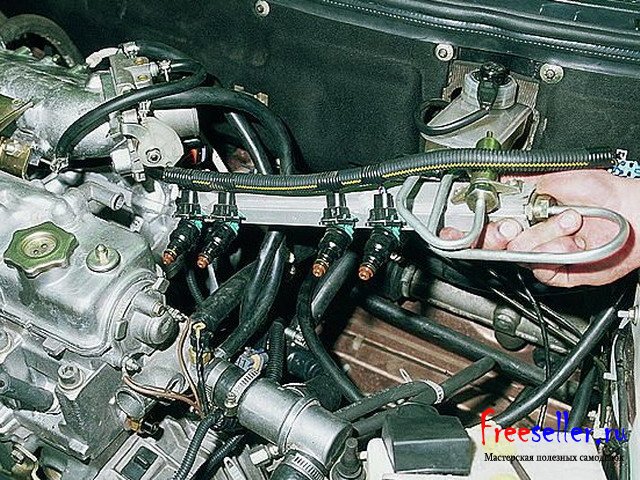
3. Remove the plate clamp that holds the fuel conductors. After this, carefully dismantle the ramp with nozzles. The nozzles are fixed tightly enough, so removing the ramp requires little effort. We lift the element and fix the conductors on the glass cleaner leash.
4. In order to dismantle the injectors, it is necessary to unfasten the fixing brackets electrical connector and element holders. It is first necessary to cover the working surface with a rag, since after dismantling the element some amount of the fuel mixture will spill out.
The gap in the ramp should be sealed to prevent foreign materials from entering.
When the injectors are removed, you can begin to restore them.
5. Connect the injector output to a relay and a 12-volt light bulb. In this case, the lamp will act as a charge absorber. The restoration of injectors is carried out under a certain pressure, so all fasteners must be securely fixed. You can make a system through which the composition for washing the element will move using several simple methods.
One method is to make a system from a rubber tube - attached to the top of the sprayer. Most in a simple way, is to supply the mixture for cleaning using a syringe.
6. Remove the rubber ring of the seal and place the hose on the tail of the element.
7. We supply power to the conductors from battery.
8. Press the button to spray the mixture and wait for the pressure to be optimized.
9. Turn the nozzles away from you and press on the sprayer.
As a rule, to thoroughly clean the element, it is worth repeating the procedure at least twice. When the spray pattern becomes uniform, nozzle cleaning is complete.
If there is no desire to restore an internal combustion engine element and you decide to replace the element, then after dismantling, the injectors are changed and the elements are assembled in the reverse order.
Thus, we will restore the productivity of the motor and increase the service life of the propulsion system.
Despite regular maintenance and washing the elements, modern manufacturers still recommend replacing injectors every 100,000 km. Changing injectors or washing them are simple, but very useful maintenance procedures for the propulsion system. The modern car enthusiast is provided with several methods for servicing injectors. You can clean the injectors using special staff or ultrasound in a specialized service. You can also restore or replace a used element with your own hands.
Regardless of the choice of technique, the main thing remains timely diagnosis and regular maintenance of the car.
Checking the injectors in a specialized workshop will cost an order of magnitude higher than restoring the elements yourself. By doing the work yourself, you remain confident in high-quality and honest service.
Injection nozzles are an integral part of gasoline or diesel engine. This device is responsible for high-precision dosed injection of fuel under a certain pressure into intake manifold or directly into the combustion chamber, which depends on design features and implementation of the power unit power supply circuit.
During operation of any type, injector nozzles tend to become clogged. On vehicles with high mileage this device may fail, since these elements operate at high temperatures, and often the fuel itself contains many impurities. As a result, the inside of the nozzle becomes covered with varnish deposits.
For the reasons stated above, the throughput is disrupted, problems may occur with both opening and closing nozzles, etc. Under such conditions, the engine loses power, fuel consumption increases, and cold start, smoke is observed. With that said, there is a periodic need for replacement as well. Next, we will look at how to remove the injectors yourself, and we will also talk about how to check a removed injector.
Read in this article
When to check injectors and fuel injection quality

Fuel injectors are initially designed for a fairly long service life (100-150 thousand km). At the same time, low quality fuel and untimely replacement fuel filters may lead to the need for cleaning after 30-40 thousand km. Let us add that there are methods for checking and cleaning injectors that allow you to carry out this procedure without removing them.
The urgent need to remove injection elements often arises closer to 100 thousand kilometers traveled, since by this time the devices usually need not only cleaning, but also detailed testing, injector calibration, or even replacement. The main reasons for such a procedure can be considered increased, noticeable increased consumption fuel, unstable engine operation in different modes (both under load and in transition).
In some cases, it is enough to identify only one faulty element, which allows you to get rid of the fault without having to remove all the injectors from the engine at once. This is especially true for diesel internal combustion engines, where dismantling can be somewhat complicated compared to gasoline-powered analogues. In short, each injector is simply turned off one at a time. The moment when one of the injectors is turned off and the engine smoke stops at the same time will indicate the need to remove and check specific device without the need to extract the rest.
Removing injectors from the engine for diagnostics


On modern injection systems the element is an electromagnetic device that opens on command to allow some of the fuel to pass through. On most cars, the injectors are installed on fuel rail(rail). The removal process may vary slightly depending on the type and internal combustion engine designs, you may also need different tools. Often, to remove fuel injectors, you need to prepare:
- screwdriver set;
- several keys;
- pliers or pliers;
- carburetor cleaner;
- rags or suitable rags;
Now let's take a closer look at the process and answer the question of how to remove injectors on a VAZ or any other fuel-injected car. First you need to reduce the pressure in fuel system. Many car models have a pressure regulator on the fuel rail. This regulator is a valve that needs to be pressed. As a result, fuel will flow out of the ramp and the pressure will drop.
Remember, injectors deliver fuel under high pressure. For this reason, care should be taken when working with components that are connected to the engine power system or are tested under pressure fuel conditions. The fact is that a jet of fuel can cause serious injury.
Next, you need to remove the fuel rail on which the injectors are attached. To dismantle it is necessary to disconnect the connectors with wires that are secured using a special clamp. The specified latch is a spring clip that must be pressed. Then you will need to use a screwdriver to move the clamp along the ramp. The injectors can now be removed.
Removal is carried out by slightly turning or rocking the device, after which you need to remove the O-rings with a flat screwdriver. The rings are usually located on the body and on the atomizer. Note that after removal, the rubber O-rings of the injectors must be replaced.
Removing injectors on diesel and direct injection engines

As for the need to remove diesel injectors or similar devices on engines with direct injection, in this case the procedure is slightly different. The main difficulty is that the elements for supplying fuel are “screwed” into the engine like spark plugs. Working under conditions of high heat often leads to injectors sticking to.
The device turns sour because moisture gets into the injector well, coking of the well occurs after exhaust gases break through, carbon deposits accumulate on the sealing ring, etc. The process of removing an injector on a diesel engine with the Common Rail system, as well as units with direct injection fuel requires the additional presence of special pullers (reverse hammer) and other tools.
Having a tool and certain skills allows you to avoid common problems when trying to remove injectors on an internal combustion engine with direct injection: damage to the injector thread, destruction of the device body, part of the nozzle body being found in the cylinder head after the device is broken, etc.
In other words, the threads become sour and the housing may simply burst during dismantling. As a result, you have to drill out the remaining parts, restore the threads and perform a number of other manipulations. In some cases, after unprofessional removal, partial repair of the cylinder head may be necessary. It should also be remembered that the injectors themselves are expensive devices. Replacing a broken element will result in additional financial costs.
How to check fuel injectors

There are many ways to check fuel injection devices, ranging from homemade ones to testing on special diagnostic stands. When checking independently, it is often possible to assess only the ability of the device to open and close, make sure that the injectors are not “pouring” or overfilling fuel, and also visually assess the quality of the fuel atomization (torch). To do this, power is supplied to the removed injector, and fuel or cleaner is pumped through it.
Let us add that diagnostics on professional equipment allows you to determine the accuracy and efficiency of each element by comparison with the others. This approach provides a much more objective assessment of serviceability and performance, since the operation of injection devices when tested on a bench imitates the operation of these elements on the engine in various modes.
Read also
Signs of malfunction and checking injection nozzles without dismantling. Diagnostics of injector power supply, performance analysis. Tips and tricks.

The cost of cleaning injectors at car services is approximately 1,500 rubles, but you can clean them yourself.
To clean the injectors yourself you will need:
Carburetor cleaner (about 2 cans);
Brake hose;
Insulating tape;
Plastic clamps for electrical wiring;
A piece of 2-core wire;
12 Volt light bulb;
Knife (stationery or other)
The cost of everything above is approximately 300-400 rubles.
Injector cleaning process
Removing the fuel rail to clean the injectors:
1. Disconnect the negative cable from the battery.
2. Remove the ramp with the fuel pressure regulator.
3. Disconnect the vacuum hose from the regulator.
4. Using two 17mm wrenches, unscrew the fittings fuel pipes, releasing fuel pressure.
5. Disconnect the electrical connector of the ramp.

6. Using a Phillips screwdriver, unscrew the screw of the bracket securing the fuel pipes... and remove it.

7. Use a 5mm hexagon to unscrew the two ramp mounting screws.

8. By pulling the ramp along the axis of the injectors, remove all four injectors from their seats and remove the ramp towards the left side of the car.
Removing the injectors
1. Squeezing the spring clip, disconnect the electrical connector of the injector.

2. Use a screwdriver to move the injector lock along the ramp... and remove it.

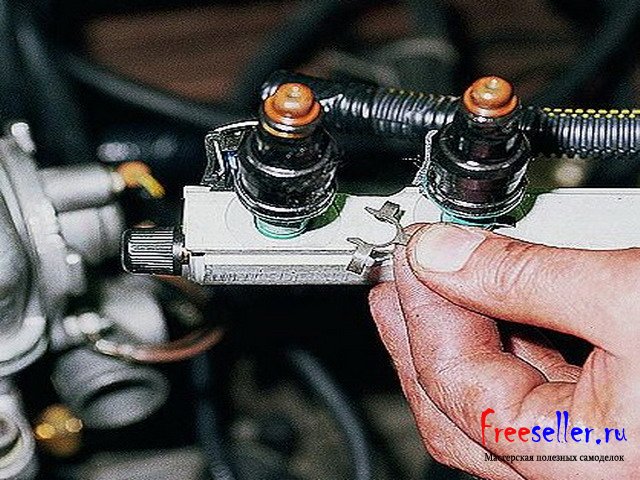
3. While rocking the nozzle, remove it from the ramp.

4. Using a screwdriver with a thin tip, remove the sealing rings... from the nozzle and the nozzle body.


Making a homemade device for cleaning injectors
1) Cut off the metal pressed nut from the rubber brake hose on one side.
2) We put the cut end of the hose onto the nozzle and secure it with a plastic clamp using a tightening strap.
3) At the other end of the hose, insert the tube included in the carburetor cleaner kit (if the kit does not include one, use a tube from WD-40 fluid). The remaining space between the tube and the brake hose can be filled with fum tape, unilock, or the remains of soundproofing material can be used. Then wrap it tightly with electrical tape.


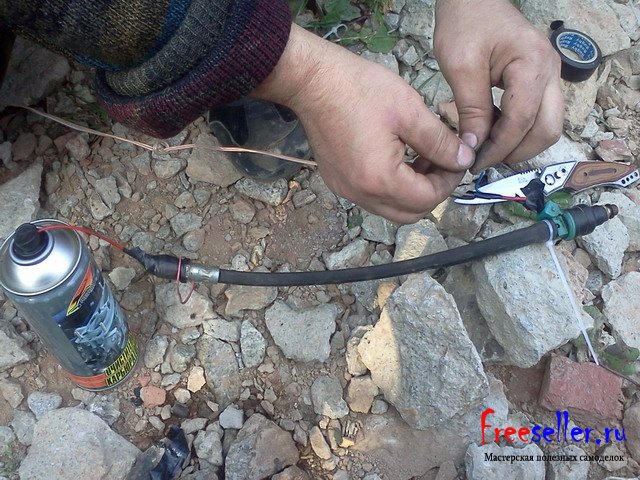
Rice. 1, 2,3. Homemade device for cleaning injectors.
4) Cleaning of injectors occurs when a voltage of 12 V is applied to the injector, and in order not to burn the injector winding, we power a 12 V light bulb in series on the positive wire, in the ground wire we make a break by inserting a switch or alligator clips, or using a working button, only then when you press it. The entire circuit is connected to the battery.

Scheme for switching on the nozzle for cleaning.
1) Create pressure in brake hose, to do this, press the spray canister several times.
2) Press the button and apply voltage to the nozzle, the nozzle begins to spray.
3) Don’t forget to press and hold the cleaner nozzle to maintain pressure in the hose.
4) We clean the nozzle until the spray from the nozzle is uniform.
After cleaning the injectors, we assemble them back onto the fuel rail, using new O-rings on all injectors on the rail side.
Install new o-rings very carefully, without using any tools, after lubricating them motor oil or WD-40 liquid.
Install the injectors in the reverse order of removal, securing them to the ramp with clamps, after tightening them a little.
Reinstall the fuel rail, connect the fuel line, secure the ground terminal to the battery, turn the ignition key in the lock 3-4 times at intervals of 2-3 seconds to create pressure in the fuel rail, and check the tightness of the connection between the pipeline and the injectors.
P.S. You should also change the injectors after cleaning them. fuel filter, and preferably a fuel pump grid, and you should only refuel at proven gas stations, and preferably 95 gasoline.
Alexander Borisov, Samara
In Russia, as well as in other countries of the former CIS, there are a huge number of gas stations. But not every one of them sells high-quality fuel that meets all norms and standards. Most often, gasoline contains not only dirt, but also various impurities and substances. These are phenols, sulfur, various lead acids. In addition, low-quality fuel has a low octane number. Every owner of an injection car should know how to remove injectors. This is useful knowledge that can come in handy when owning a used car.
Symptoms of clogged injectors
As the vehicle is used, the injectors tend to become clogged. On cars with a mileage of 200 thousand or more, they may fail. Often the cause of injector failure is exposure to high temperatures. The inside of this element is covered with varnish deposits. As a result, problems appear during the engine starting process, the engine troits, and operates unstable in all modes. Due to these deposits and contaminants, the ability to pass fuel is greatly impaired. Problems arise during the process of opening and closing the injectors. All this leads to one or more of these symptoms.
Where are they located?
Injectors on an injection engine internal combustion are located in the fuel rail. Their number is equal to the number of cylinders in the engine.
When to check your work
The injectors responsible for supplying fuel can be used for quite a long time - manufacturers indicate at least 100-150 thousand kilometers. But, considering the quality of the fuel and untimely replacement fuel filters, the need to check and clean them may occur after 80 thousand kilometers.  The need for dismantling most often appears closer to 100 thousand kilometers. The injectors are calibrated, tested, and, if necessary, replaced and cleaned. Sometimes the reason unstable work The engine may only have one element. There is no need to remove all parts. This is especially true for diesel engines, where the operating process is much more complex compared to its gasoline counterpart.
Removing injectors for diagnostics
Let's see how to remove the injectors to test them. For dismantling you will need a standard set of screwdrivers, wrenches, pliers, injector or carburetor cleaner, and rags.
Let's consider the removal process using VAZ engines as an example. So, the first thing you need to do is lower the pressure that forms in the fuel system. On most modern cars There is a special pressure regulator - it is located on the fuel rail. It's nothing more than special valve, which you can click on. As a result, fuel from the ramp will flow out, and the pressure level will begin to drop.  Gasoline is supplied to the injector when sufficient high blood pressure Therefore, precautions must be taken when working with them. A stream of gasoline or diesel fuel may cause significant harm.
When you have managed to relieve the pressure, you need to remove the fuel rail. To do this, disconnect the connectors with wires. They can be removed using special clamps, which are an elastic bracket that must be pressed. Next, use a screwdriver to move the clamp along the ramp. After this you can remove the injectors.
Many car owners who do not know how to remove injectors try to pull them out. But this is not how you need to extract them. Dismantling is carried out after slight turns or rocking. Next, use a screwdriver to remove the O-rings - they are located on the injector nozzle on its body. It is worth remembering that these rings can only be used once - if they are removed once, they must be replaced.
Removing diesel elements
Nozzle diesel fuel is also susceptible to failure due to fuel quality. The dismantling process in this case is different. Main feature the fact that this element is screwed into the engine, like a spark plug. Operating the injector under high temperature conditions leads to the part sticking to the engine cylinder head.
The nozzle sticks due to moisture entering the well (where the element is installed). Next, the well becomes coked due to a breakthrough there exhaust gases. Carbon deposits also actively accumulate on the O-rings. The process of removing a fuel injector from a diesel engine, unlike gasoline engine requires additional special tools and pullers. Using pullers, you can reduce the risk of damage to threads and destruction of body parts.  Once the thread has soured, it is very difficult to unscrew the part. During the dismantling process, the nozzle body may simply burst. In this case, you will only have to drill out the remaining part in the cylinder head, then perform thread restoration and other manipulations. Those who don't know how to remove injectors may need to rebuild the cylinder head. It must be remembered that the nozzle is an expensive part. Carefully unscrew the part from its seat- this is the entire dismantling process.
Examination
There are many ways to check an injector. These are homemade methods, as well as testing methods using special equipment. If you check it yourself, you can only evaluate the opening/closing of the injector. You can also make sure that the injector is not leaking or overfilling fuel. Also during self-check you can evaluate the quality of the spray. Not many people know how to check a removed injector, but all you need to do is connect the power and pass fuel or a cleaning agent through it.  As for diagnostics using professional stands, this equipment allows you to determine more parameters. This is the accuracy of operation, as well as the efficiency of operation of all nozzles and each individually. This allows you to accurately and objectively evaluate the performance of the injection system.
Cleaning
We know how to remove injectors from an engine. You should also find out how the process of washing and cleaning them is carried out. You can wash them in two ways - with removal and without removal. A greater effect can only be achieved by washing and removing.  The most common method involves the presence of keys for dismantling, a charged battery, two wires and terminals for them, as well as a cleaning fluid. The fuel rail is removed, and then the injector. The wires are connected to the latter. A can of cleaner is connected to the nozzle through the inlet hole. Then they press on the sprayer and close the wire on the battery, thereby activating solenoid valve. You can also assemble a stand for cleaning injectors. But it is very long and expensive.
How to clean injectors without removing them
For this you need a flushing cylinder. It is made independently. You will also need a compressor and a pressure gauge, a hose that will be connected to the fuel rail. Liquid for cleaning injectors is poured into the flushing cylinder, and the cylinder is connected to the system. Next, start the engine and turn on the compressor. Cleaning will be completed when all the liquid has been used up.
Here's how to clean the injectors without removing them. The disadvantage of this technique is that there is no way to control the level of contamination, as well as the degree of purification. But this operation requires the least time and effort.